These guides have been created to help you piece together the hardware, software, and information that you need in order to create a product with ANT. Of course the product development process varies depending on whether you are working on a software application, an embedded product (such as a new sensor or display unit), or a mobile app.
If you do not yet understand how the ANT protocol works then it is recommended that you start with: ANT Basics
This guide will outline the main steps in the development of PC applications that can connect to an ANT chip or module, receive ANT messages from a specific ANT+ device, and decode this data according to its ANT+ device profile. It is assumed that you are already familiar with the basic operation of the ANT protocol and the use of network keys.
If you are using a Mac, then you do not need to install any drivers for the ANT USB sticks. Instead, please install the ANT MacOSX Library Package with Source Code.
In the newer versions of Windows you may find that these drivers install automatically the first time you insert the USB Stick. Otherwise Windows drivers for the ANT USB1 and USB2 sticks can be found under Software Tools on the downloads page on the website. Make sure you install drivers that match the type of USB stick you are using. The type of the USB stick(USB1/USB2) is printed on the dongle itself. If using the USB Interface Board (UIF) and an ANT module, you will need the drivers for USB1. Full instructions for installing the drivers for the USB stick are available in the "ANT Development Kit User Manual"
Once the ANT USB stick has been successfully installed, it should be listed on the Device Manager as a Universal Serial Bus controller. The name of the device will vary depending on whether the device is a commercial ANT USB1 or USB2 stick, or an interface board connected to an ANT module from an ANT development kit.
Important!
If drivers for an ANT USB stick bundled with an ANT+ enabled consumer product have already been installed, it is not necessary to install additional drivers. Only one application can access the ANT USB stick at a time. As such, all 3rd party applications (e.g Garmin ANT Agent) must be closed to allow the ANT+ development tools and your own applications access to the USB device.
Note for Mac Developers: ANTwareII and SimulANT+ use the .NET framework, and are therefore unavailable for Mac OS. However, there is a version of the ANT Library Package for Mac OS that can be used to develop ANT and ANT+ enabled applications for Mac OS. A sample Xcode project is provided; please refer to the DEMO_LIB and DEMO_DYLIB targets to get started.
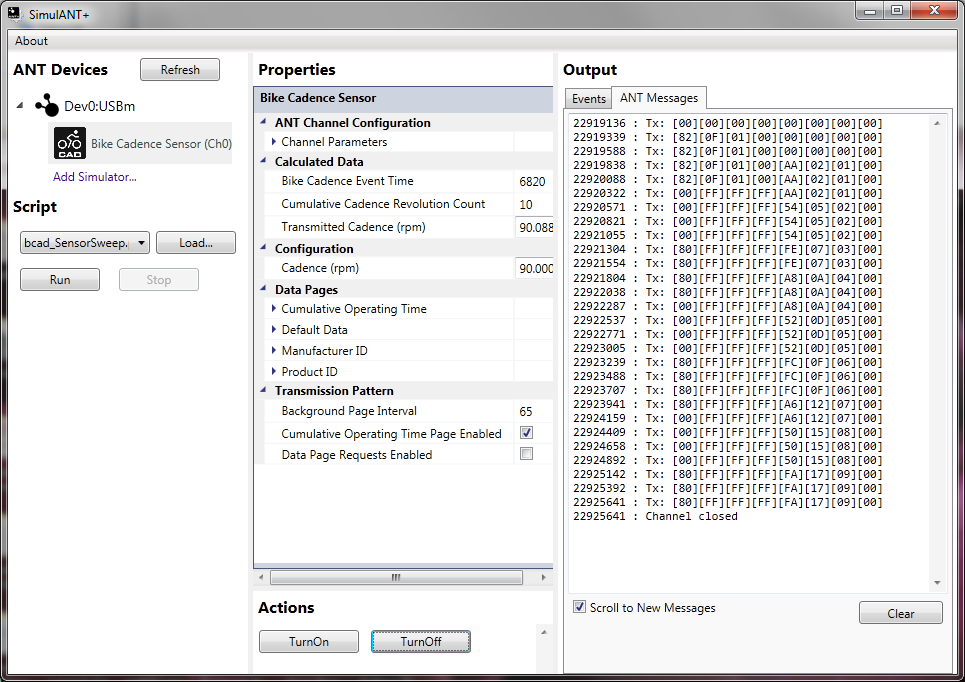
One of the key tools in ANT+ application development is SimulANT+. This software tool allows developers to create applications compatible with ANT+ sensors without the need for a physical sensor to generate ANT+ data during development (and vice versa). Before starting to work on custom ANT+ applications, we highly recommend becoming familiar with SimulANT+. This application, along with its user guide, is available on the downloads page.
NOTE: The old ANT+ Sensor and Display Simulators have now been replaced by SimulANT+ for most device profiles.
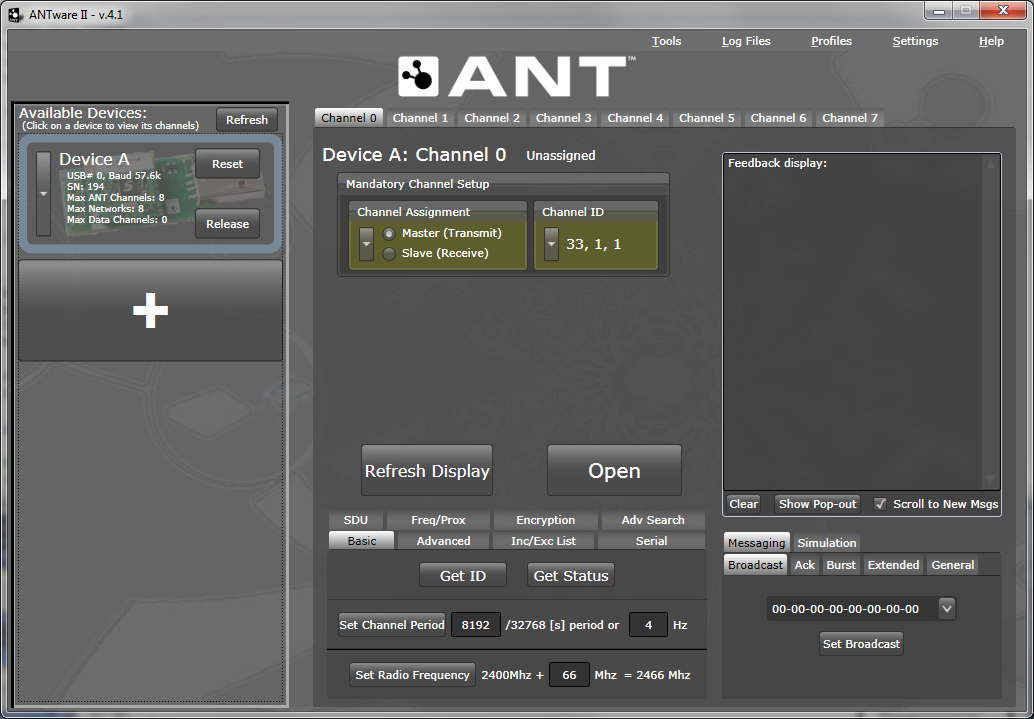
To gain hands-on experience with ANT, we recommend getting familiar with ANTwareII as your next step. ANTwareII is a GUI application used to control ANT devices, and it is an excellent resource for exploring the capabilities of ANT. ANTwareII can be used to set up ANT channels and experiment with ANT’s configuration commands. This application, along with its user guide, is available on the downloads page.
The ANT Windows Library Package contains a set of libraries to facilitate development of ANT enabled applications, along with demonstration applications illustrating the usage of the ANT libraries. The libraries contain functionality to connect to ANT enabled USB sticks, handle the low level serial communication, ANT message framing, and optional logging of raw messages during communication sessions for debug purposes. The library package (including full source code) is available on the downloads page.
The ANT_Libraries.sln can be opened and compiled directly with Visual C++ 2008. This solution includes all settings to build the libraries and accompanying demos. Please have a look at the readme.txt file included within the Library Package, as it outlines its contents, the different projects available, and the dependencies between projects.
To get started:
The source code of the demo applications is a great starting point to get familiar with the ANT library; all commands needed to configure and open an ANT channel are explained through documentation within the code.
The ANT_NET_Libraries.sln contains the ANT Managed library, for use with .NET applications. The ANT_LIB solution must be built before attempting to use the managed library, to resolve dependencies. Alternatively, the DLL’s from the BIN directory may be copied into the working directory of the built project. Copying the ANT_NET.xml file as well, and including it in a project using the ANT_NET.dll will enable IntelliSense documentation for the ANT Managed Library.
The DEMO_NET project is the best example to refer to in order to get familiar with the usage of the managed library. To get started with this code:
Apart from the code related to loading the libraries and connecting to the USB stick, almost all the function calls in the libraries correspond to messages described in the "ANT Message Protocol and Usage Document". Please refer back to this document for detailed descriptions of each of the commands.
ANT+ Device Profiles define the channel parameters and format of the data payload of specific devices. In other words, for a display device, a device profile specifies how to configure an ANT channel to receive data from a particular sensor, and how to decode the data received from that sensor. For a sensor device, a device profile specifies how to configure an ANT channel to send data, and how to format the sensor data to be transmitted.
Device profiles are available on the downloads page. To access them just sign up as an ANT+ Adopter. Each device profile contains a detailed specification of the channel parameters and data format for each sensor type.
For sample code implementing some profiles, refer to the source code of the ANT+ simulator, (also available on the downloads page). To build the code, you can use Microsoft Visual C++ 2008 or later. The “devices” directory within the project contains the code specific to each sensor and display device, and can serve as a reference for PC applications implementing ANT+ functionality.
Embedded C reference code for the MSP430 for some of the profiles is also available on the downloads page, under 'ANT+ Embedded Reference Designs'.
This guide will outline the main steps involved in integrating an ANT network processor into an embedded design. It is assumed that you are already familiar with the basic operation of the ANT protocol and the use of network keys.
A typical ANT-enabled device consists of an application host MCU interfaced with an ANT network processor (module, chipset or chip). The host MCU establishes and maintains a communication session to a remote ANT-enabled device by means of a simple, bidirectional, serial message protocol, as shown in the figure below.

Note that it is NOT possible to load custom code on an ANT network processor; an external microcontroller is required to run application code, along with the serial drivers and messaging to interface to ANT.
The encapsulation of the wireless protocol complexity within the ANT chipset vastly reduces the burden on the application host controller, allowing a low-cost 4-bit or 8-bit microcontroller to establish and maintain complex wireless networks. Basic ANT connectivity can be enabled with less than 1 kB code space, and an asynchronous or synchronous serial interface. Microcontroller choice is up to the developer, and driven by the requirements of the application.
ANT Development Kits offer an excellent starting point for evaluation and prototyping using ANT. The Development Kits include RF modules and accessory boards to help you get started with your development. Development Kits do NOT include a host microcontroller.
Reference schematics for connecting an ANT module to a host microcontroller are available on the datasheet of the corresponding module (you can find datasheets under the documents tab of the downloads page). The sample schematics show how to connect the ANT module to an application microcontroller for each of the available serial modes. If you are using a FIT1e module, please refer to the “FIT1e Application Note” for specific interfacing requirements and reference schematics.
If you are creating your own custom board using an ANT chip solution, please refer to the datasheets for the corresponding chip solution for reference schematics. Reference layouts are available from the chip vendor.
In order to establish serial communication with an ANT network processor, there are two key documents that ANT developers need to review:
Reference code for the MSP430 microcontroller is also available on the downloads page:
It is highly recommended that you use the ANT+ Embedded Reference Designs as a starting point for your project, as this code implements all three methods of serial communication, and is the easiest to understand. The Heart Rate Monitor transmitter reference design (antplus_hrm_tx) is a great place to start.
In order to check that your ANT node is up and running, you can use an ANT USB stick (or an ANT module together with a USB interface board) to set up an ANT channel between your embedded device and ANTware II, running on a PC. Make sure that channel parameters are configured correctly in ANTwareII – if the channel configuration in your embedded device is for a master, make sure ANTwareII is configured as the slave, and vice versa. Network key, radio frequency, channel ID and channel period must all match for communication to occur. Refer to the “ANT Development Kit User Manual” for additional details on installing USB drivers and using ANTwareII to setup a channel.
It is also recommended that you use a logic analyser to verify the implementation of the serial drivers. Timing diagrams are a valuable tool for troubleshooting issues with serial communication.
You may also find it helpful to review the information in 'I want to create: A Software Application', in particular the sections on the ANT+ Simulator and ANTwareII.
This guide will outline the main steps involved in developing mobile apps that can interact with ANT sensors. If you are new to developing with ANT generally, then you may also find it helpful to take a look at the 'I want to create: A Software Application' section of this page. It is assumed that you are already familiar with the basic operation of the ANT protocol and the use of network keys.
Note: If you develop with the Android ANT+ Plugins, most of the ANT-level details are handled internally.
The list of manufacturers who are releasing phones with ANT support, and the number of phones with ANT support is constantly growing. The ANT USB Service also provides ANT support to any Android device with USB Host mode enabled through the use of attached USB sticks. Third party adapters such as the SelfLoops ANT adapter extend support to even more phones. Android Emulator support is provided as a development tool; allowing anyone with a PC and an ANT USB stick to develop ANT applications for Android.
You can check the list of phones that support ANT in the ANT+ product directory - just select Mobile Phones/Devices in the 'Categories' filter. You can also see which apps are currently available by selecting 'Apps' instead of 'Devices'.
Download the Android ANT+ SDK or Android ANT SDK.
Using the Android ANT+ SDK to communicate with ANT+ devices:
Using the Android ANT SDK to create custom ANT applications:
If you would like to develop Android apps on a PC using the Android Emulator, you would also find the ANT Emulator Bridge helpful. The emulator bridge will connect an ANT USB stick/interface board (plugged in to the PC) to the Android Emulator. This allows you to utilize ANT communication from within the emulator.
Along with the required API libraries, the Android ANT and ANT+ SDKs both contain javadoc, sample applications and their source code, and some reference material to get you started. The document 'Creating ANT+ Android Applications' has been written to give you a brief summary of the typical use cases you will use interacting with the libraries. The included sample apps and their source code demonstrate how to use and interact with the APIs in practice. The sample app source code is included as Eclipse projects for convenience in working with the Android SDK bundle (http://developer.android.com/sdk/index.html).
If you are implementing custom ANT communication scenarios you will find the ANT Message Protocol and Usage Document to be a valuable reference. Of course it will also help you to understand how Android works. If you need to brush up your skills, then take a look at the Android Developers Guide.
No official iOS dongle or API is currently provided by ANT wireless. Wahoo Fitness, an ANT+ Alliance Member, provides an iOS dongle and API for iOS development; please refer to their website for more details.
You can create compact files that will be understood by other devices using the file format ".fit". This is defined and described by the Flexible and Interoperable Data Transfer (FIT) protocol.
FIT is used by many sport, fitness and health devices to store and share data. This binary format is compact, extensible and interoperable with many other FIT compliant systems ranging from sensors and displays to internet applications.
Predefined templates have been created using best practices to cover many common ANT+ scenarios. Custom messages and files may also be generated for application specific cases.
Once your files have been created, you need a way to transfer them, and if you would like to do that using ANT, then you can: ANT-FS (or ANT File Share) was developed for exactly this purpose.
ANT File Share is an extension of the ANT protocol that provides a robust framework for transferring files wirelessly between two devices. ANT-FS was designed for ultra low power, and can be used in coin cell battery operated devices on both sides of the link.
ANT-FS can be used in display devices with storage capabilities, such as fitness watches, which collect real-time data from sensors and allow it to be downloaded by a PC at a later time.
We have put together a full description of how to work with ANT-FS and FIT to guide you through. Please note that if you are using an ANT+ Device profile, this may well specify the way in which you should use ANT-FS and FIT - it is important to follow the device profile specification to ensure your device remains interoperable with other ANT+ devices.
The ANT+ Sync Device Profile should be used for interoperable ANT-FS and FIT file transfer between devices not covered by other ANT+ device profiles.
Registration as an ANT+ Adopter also provides access to the ANT+ section of the forum, with additional resources regarding specific device profiles and ANT-FS.
